
We have prepared a clear "step by step" instruction on how to apply the sticker to the selected surface, to achieve wonderful decorative effects!

1. Surface preparation
Begin by cleaning the surface where the sticker is planned to be installed. Paint coatings should be cleaned and wiped with a cloth to remove dust. For applications on surfaces that allow chemical degreasing, they should be wiped with denatured alcohol or extraction gasoline. Stickers can be installed on all smooth surfaces - furniture, glass, mirrors, plastics, metal, etc.
ATTENTION!
Wall murals, printed stickers, and self-adhesive boards can be installed no earlier than 14 days after painting walls. Earlier installation may result in their peeling off and is not covered by the warranty. Paints with a high latex content, washable, stain-resistant, or facade paints adversely affect product adhesion. When deciding to create decorations on this substrate, you must conduct a test and exercise particular caution. We are not responsible and do not accept claims related to the peeling of decorations to this type of paint.
2. Sticker preparation
The sticker is delivered in a cardboard transport tube in the form of a roll. Take it out and unfold it on a flat surface with the pattern facing down. Use a squeegee or a folded cloth to smooth the surface of the paper so that the sticker layers perfectly adhere to each other.

3. Planning the layout
Place the sticker with adhesive tape, without peeling off the backing paper, in the planned spot. This way, you can verify its position. If you have a multi-element sticker, you can divide it into smaller parts and arrange the composition yourself.
We suggest installing it with two people. It's always more fun and sure.

4. Removing the backing paper
After positioning, peel off the thick, grid-lined paper from the bottom. Start from a corner, ensuring no design elements remain on it. If this happens, reattach that section, press down the pattern, and gently peel off the paper. Peel off approximately 40 cm of the backing paper at a time, ensuring the sticker does not stick to the surface being applied.

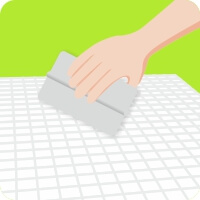
5. Installation
Using a squeegee, press only the sticker itself against the wall. Move the squeegee in horizontal bands, gradually moving downwards. This prevents air bubbles from being trapped under the design.
After sticking about 20 cm, peel off another part of the transport paper, and repeat the process until the entire sticker is applied.

6. Removing the transport paper
After applying the design, immediately start peeling off the transport paper. Move it parallel to the surface at a steady, slow pace. Watch carefully to ensure all design elements stay on the surface. If any remain on the paper, go back a few centimeters, press the element through the paper, and peel off from the surface again.

7. Final verification
Check if the sticker adheres well to the surface and if there are any air bubbles. If so, use a needle to gently puncture them and smooth out using a soft cloth.
Congratulations!
We have prepared a clear "step by step" instruction on how to create a graphic using a template, to achieve wonderful decorative results!
1. Surface preparation
Begin by cleaning the surface where you plan to place the graphic. Paint coatings should be cleaned and wiped with a cloth to remove dust. Inside the package, you will find a template sample. Use it (in a less visible place) to check if it peels off the wall well. Plasters and paints with low adhesion to the wall may peel off when removing the template. If this is the case, please contact us.
ATTENTION!
Templates can be used no earlier than 14 days after painting walls. Earlier installation may result in their peeling off and is not covered by the warranty. Paints with a high latex content, washable, stain-resistant, or facade paints adversely affect product adhesion. When deciding to create decorations on this substrate, you must conduct a test and exercise particular caution. We are not responsible and do not accept claims related to the peeling of decorations to this type of paint.
2. Template preparation
The template is delivered in a cardboard transport tube in the form of a roll. Take it out and unfold it on a flat surface with the pattern facing down. Use a squeegee or a folded cloth to smooth the surface of the paper so that the template layers perfectly adhere to each other.

3. Planning the layout
Secure the template with adhesive tape at the planned location. This way, you can verify the composition and the mutual arrangement of elements relative to each other.
4. Removing the backing paper
After positioning, peel off the thick, grid-lined paper from the bottom. Start from a corner, ensuring no design elements remain on it. If this happens, reattach that section, press down the pattern, and gently peel off the paper. Peel off approximately 40 cm of the backing paper at a time, ensuring the template does not stick to the surface being applied.
5. Installation
Using a squeegee, press only the template itself against the wall. Move the squeegee in horizontal bands, gradually moving downwards. This prevents air bubbles from being trapped under the design.

6. Removing the transport paper and painting the design
After applying the template, immediately start peeling off the transport paper. Move it parallel to the surface at a steady, slow pace. Watch carefully to ensure all design elements stay on the surface. If any remain on the paper, go back a few centimeters, press the element through the paper, and peel off from the surface again.
Begin painting from the edges of the design. Apply several layers, each time using a small amount of paint. You can use a roller or a sponge.

7. Removing the template
After applying the last layer, wait a moment and then peel off the template from the wall, moving slowly and evenly.

8. Your design
Your design has been revealed.
Congratulations!
We have prepared a clear "step by step" instruction on how to install self-adhesive products, to achieve wonderful decorative results!
1. Surface preparation
Begin by cleaning the surface where you plan to place the decoration. Paint coatings should be cleaned and wiped with a damp cloth to remove dust.
Wait a moment to ensure the wall is completely dry.
ATTENTION!
Wall murals, printed stickers, and self-adhesive boards can be installed no earlier than 14 days after painting walls. Earlier installation may result in their peeling off and is not covered by the warranty. Paints with a high latex content, washable, stain-resistant, or facade paints adversely affect product adhesion. When deciding to create decorations on this substrate, you must conduct a test and exercise particular caution. We are not responsible and do not accept claims related to the peeling of decorations to this type of paint.

2. Decoration
The product is delivered in a cardboard transport tube in the form of a roll. Take it out and unfold it on a flat surface with the pattern facing up so that it can straighten out.
3. Planning the layout
Place the decoration in the planned spot, if needed you can fix it at the corners with gentle paper adhesive tape. This way, you can verify the composition and arrangement.

4. Laying out panels
If one of the dimensions of the photo wallpaper exceeds 130 cm, then it is delivered in the form of panels (vertical strips), which are glued overlapping so that each part fits perfectly and creates a coherent, beautiful pattern as a whole.
5. Installation
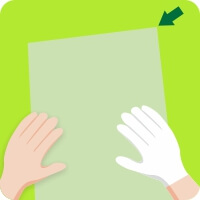
After positioning, peel off a corner from the shorter side of the decoration. In the case of photo wallpaper divided into panels, start gluing from the first one on the left and successively apply the next ones.
Using a gentle fabric glove or squeegee, softly attach it to the wall, pressing it down place by place while simultaneously removing the backing paper from underneath.
The decoration is made of professional film, if something does not go as planned, you can detach a section from the substrate and reapply it.
After applying the entire piece, press especially hard on the edges.
Congratulations!
We have prepared a clear "step by step" instruction on how to install wallpaper.
1. Surface preparation
Begin by cleaning the surface where you plan to place the photo wallpaper. Paint coatings should be cleaned and wiped with a cloth to remove dust. The substrate must be dry and smooth. Any cracks and scratches need to be filled in.
ATTENTION!
We recommend applying the wallpaper after making sure that the wall is dry. Earlier installation may result in the peeling of the photo wallpaper and is not covered by the warranty.
2. Decoration
The photo wallpaper is delivered in a cardboard transport tube in the form of a roll. Take it out and unfold it on a flat surface with the pattern facing up so that it can straighten out.
3. Planning the layout
Place the photo wallpaper in the planned spot, if needed you can fix it at the corners with gentle paper adhesive tape. This way, you can verify the composition and arrangement.
We suggest installing it with two people. It's always more fun and sure.
4. Laying out panels
If one of the dimensions of the photo wallpaper exceeds 100-130 cm, then it is delivered in the form of panels (vertical or horizontal strips), which are glued overlapping so that each part fits perfectly and creates a coherent, beautiful pattern as a whole.
5. Installation
After positioning, mark on the wall the place from where you will start applying the photo wallpaper. In the case of photo wallpaper divided into panels, start gluing from the first one on the left and successively apply the next ones. Prepare the glue according to the instructions on the package and spread it evenly with a wide brush on the back surface of the photo wallpaper. Adjust the amount of glue to the absorption capacity of the wallpaper. Leave the wallpaper for a few minutes to soak evenly with glue. Then apply the panel to the wall, press it down with a soft rubber roller to remove air bubbles. Immediately remove any excess glue with a damp cloth.
After applying the entire piece, press especially hard on the edges.
Congratulations!